Creating and disseminating educational resources for SSPCloud users
Startup guide
This tutorial provides a practical guide for developing educational resources in or Python and sharing them easily. It also aims to quickly equip you with the skills to build educational resources with state-of-the-art level of reproducibility. The next sections explain how to develop educational resources, and how to disseminate them on the SPPCloud. Keep in mind that this tutorial is intended for people developing resources, not for the users of these resources. Required technical prerequisites are detailed in Important 1.
- A minimum level of proficiency in
Gitis required to develop and make available online training resources. However, accessing these resources onSSPClouddoes not require any familiarity with Git. Quartothe automated report and website builder inherited from R Markdown.- An understanding of the fundamental difference between making resources available for execution on a local computer or on a server like
SSPCloud. SeeSSPClouddocumentation. - Some knowledge regarding deployment of resources using
Github Actionsis useful. This tutorial gives a few templates but understanding what is happening behind the stage is not in the scope of that tutorial.
1 Benefits of sharing educational resources on SSPCloud
Sharing educational resources on SSPCloud offers several advantages, particularly for educators and learners working with computational tools like R or Python. The key benefits include :
Instant access via a simple link
SSPCloudallows users to launch pre-configured workspaces through a simple HTTPS link. This eliminates the need for local installation or complex setup: learners can start working immediately, directly in their browser. You can find some tutorials examples.Standardized and reproducible environments Everyone accesses the same cloud-based environment, including all necessary packages, tools, and datasets. This ensures full consistency across learners, removing issues related to differing operating systems, versions, or missing dependencies.
Scalable computing power
SSPCloudoffers access to robust computational resources that can scale with your needs. From beginner tutorials in Python or R to advanced workflows involving large datasets or machine learning models, the platform can support a wide range of educational use cases.
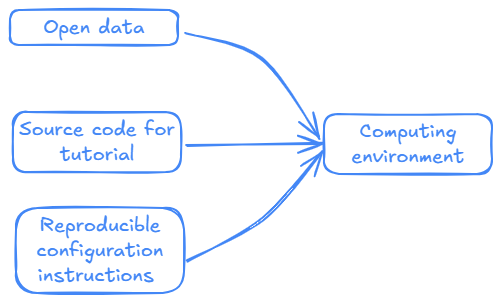
As outlined in the SSPCloud documentation, it’s important to understand that the platform separates code (Git), data (S3), and environment configuration. These components are dynamically combined when launching a compute session.
For training designers, this architecture ensures high reproducibility and fine-grained control over the environment. For users, it eliminates the need to install software, manage system permissions, or configure their local machine—making it easy to jump straight into the tutorial.
SSPCloud works2 Selecting appropriate training materials
When designing effective training materials, it’s essential to choose formats that actively engage learners and support comprehension. While PDFs, slide decks, and videos are all valuable for delivering content, this guide focuses on static websites and interactive environments, which are particularly well-suited for hands-on learning. These environments enable learners to apply concepts immediately, test code in real time, and actively engage with the material—leading to deeper understanding and better long-term retention.
In the sections that follow, we’ll begin by comparing various interactive environments based on the programming language they support. Then, we’ll walk through how to build and structure them using Quarto.
2.1 Selecting the right interactive environment
2.1.1 📓 The final product: the interactive notebook
Jupyter notebooks1 offer an interactive interface that allows you to write Python code, test it, and see the result below the instruction rather than in a separate console. Jupyter notebooks are essential in the fields of data science and education and research because they greatly simplify exploration and experimentation.
They allow you to combine text in Markdown format (a lighter markup text format than HTML or \(\LaTeX\)), Python code, and HTML code for visualizations and animations in a single document.
2.1.2 🛠️ The development environment: where you create notebooks
Initially, Jupyter Jupyter.
💡 For this reason, as of 2025, we recommend developing resources with
VSCode, a general-purpose code editor but offering excellent features in Python, rather than withJupyter.
For more information on using notebooks in VSCode, refer to the official documentation.
Although we recommend developing resources with Vscode rather than with Jupyter, final users will be able to open your educational resources with Jupyter if they want to.
Jupyter 
VSCode 2.1.3 📓 The final product: the Quarto Markdown file or HTML website
In , notebooks are not commonly used - even though they offer several features that are particularly valuable for educational purposes.
When designing -based training materials, two main options are available, each with its own pros and cons:
- Providing access to an HTML website
- Advantages: Solutions to exercices can be hidden, interactive widgets can be used to offer hints or guide learners step by step, and the layout is optimized for reading.
- Drawbacks: This is not an interactive environment—learners must open a separate RStudio session to try out the code, which can disrupt the flow of learning.
- Providing access to a Quarto Markdown (.qmd) file
- Advantages: Fully interactive—learners can run code directly within the environment, benefiting from live feedback and hands-on practice.
- Drawbacks: All answers and code are visible by default, which may reduce engagement and exploratory effort from the learners.
Since the first option can become cumbersome - especially when learners need to copy and paste large blocks of code - it is generally recommended to use the second option in most cases. Providing direct access to a Quarto Markdown file helps minimize the risk of hard-to-reproduce errors that often arise when learners switch between an HTML tutorial and their R session.
2.1.4 🛠️ The development environment: where you create your resources
You can develop your educational resources with RStudio IDE or with VSCode, a general-purpose code editor that can also be used with Python.
2.1.5 🛠️ The development environment: where you create your resources
You can develop your educational resources with RStudio IDE or with VSCode, a general-purpose code editor that can also be used with Python.
2.2 Using Quarto
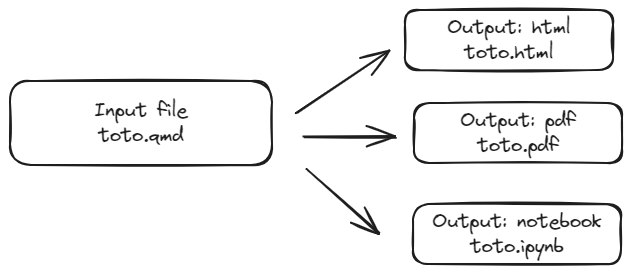
Quarto is an open source program for creating Python and reproducible tutorials. It makes it possible to mix seamlessly code and text in the same document and can handle many output formats, including html, pdf or notebook (.ipynb extension).
Quarto is strongly recommended for the development of educational resources.
This tutorial assumes educational resources will be available in two formats :
Quartowebsites - based on multipleQuartofiles and mixing text and code chunks;- Interactive environment (see ☝️).
3 Step-by-Step Guide
3.1 Step 1: create a Github repository from a template
3.1.1 What are templates and why use them?
The very first step towards developing educational resources consists in creating a Github repository that will contain them all. We recommend that you use the templates developed specifically for the AIML4OS project. There are two different templates, depending on the language you want to use. They are both hosted on Github :
These templates contain all what you need to produce resources that can be easily made available as websites or as interactive environments on SSPCloud. More precisely, these templates contain:
- a minimal
Quartowebsite with visual elements reflecting AIML4OS aesthetic; - a minimal example of a
Quartodocument producing a Jupyter Notebook ( only); - a minimal example of a
Quartodocument mixing Markdown text andRcode ( only); - what is needed to manage dependencies (what packages are needed to run the codes, and in which version);
- scripts for
Github Actionsworkflow for automated deployment (don’t be afraid, see below!).
You can still use the templates - just remove the AIML4OS-styled components.
3.1.2 How to use a template?
Here is what to do to re-use a template:
- Go to the
Githubpage of the chosen template; - Click on the “Use this template” button and then on “Create a new repository” (see Figure 1);

Github
- Choose carefully the owner and the name of the new repository:
Owner: by default the owner is the creator of the fork, but it may be preferable to choose a Github organization (for instance theAIML4OSorganization);Name: give the repository a meaningful name, for instance “Intro_To_Deep_Learning” or “Intro_To_Linear_Regression”;
- Set
Choose visibilitytoPublic.
3.2 Step 2: define your development configuration on SSPCloud
SSPCloud is not only useful to disseminate educational resources; it is also the right place to develop them. Doing so will facilitate resource dissemination as the environment used for training will be equivalent to the one used for development. In other words, we strongly recommend developing on SSPCloud as it will greatly improve the reproducibility of your educational resources.
Some elements of this development environment will be re-used to provide a ready-to-use configuration for learners. However, learners don’t need to be familiar with the technical concepts of configuration: pre-configured environments do exist so that learners can concentrate on acquiring skills!
3.2.1 What is a configuration and why is it useful?
The best way to develop resources on SSPCloud is to define your own development configuration. In technical terms, a configuration is just a service available on SSPCloud (eg: RStudio or VSCode) with additional user-defined settings such as: the Github repository you want to work on, your Github credentials, the size of memory and number of CPU you want to use, the initialization script you want to run…
Defining a configuration has two advantages:
- it lets you define explicitly the technical environment you want to use for a specific project;
- you can resume working on your project at any time in only one click, and be sure that the technical environment remains exactly the same.
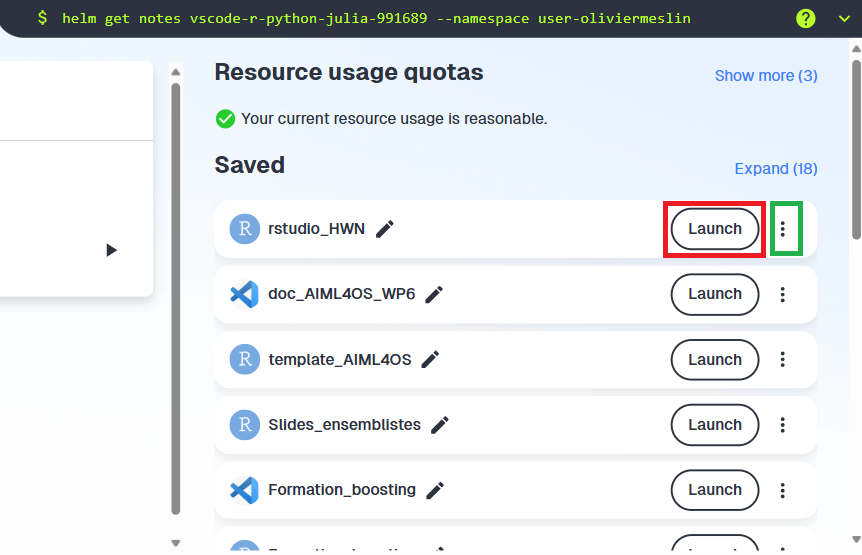
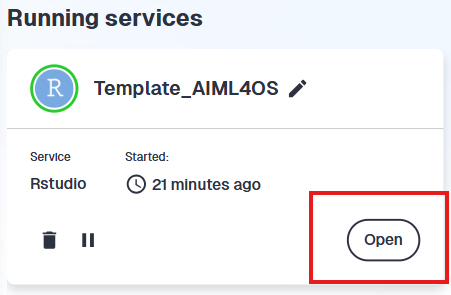
Your ready-to-use configurations are listed on the right-hand-side of the “My services” tab. To use a configuration, you just have to click on Launch (red rectangle). You can modify or delete an existing configuration by clicking on the contextual menu (green rectangle).
Defining a configuration may seem complicated at first, but you’ll quickly get the hang of it.
3.2.2 How to define a configuration
Here is how to define a ready to use development configuration using SSPCloud. A video version is proposed below the text.
If you’re using SSPCloud for the first time, you must configure your personal access token on GitHub in order to access to your GitHub repository (see version control for more details). You don’t have to configure your GitHub personal token access every time afterwards.
- In the SSPCloud, go to the “My Services” Tab and click on “New Service”;
- Choose Rstudio and click Launch;
- Customize the configuration by changing four settings:
- In the “Initialization scripts” tab, paste this URL
https://raw.githubusercontent.com/{OWNER}/{REPO}/refs/heads/main/init.sh, after replacingOWNERandREPOby the owner and repository name you chose in step 1; - In the “Friendly Name” field, choose a meaningful name (for instance
dev_Intro_To_Linear_Regression);
- In the “Repository” field of the “Git” tab, paste the URL of the repository you created in step 1 (for instance:
https://www.github.com/AIML4OS/Intro_To_Linear_Regression); - In the “Network Access” tab, enable access to your service through port 5000;
- In the “Initialization scripts” tab, paste this URL
- Click on Save configuration;
- Click on Launch and open the Rstudio service (this may take a few minutes, see box below);
- Rename the Rproj file with a meaningful name (for instance
Intro_To_Linear_Regression.Rproj), commit this change and push it; - You’re ready to go!
Rstudio services may take a lot of time to start (up to 10 minutes!), because installing dependencies with renv is quite slow. If you get a time-out error, close and re-open the service (but do not delete it!), it will open eventually.
- In the SSPCloud, go to the “My Services” Tab and click on “New Service”;
- Choose
Vscode-pythonand clickLaunch2; - Customize the configuration by changing four settings:
- In the “Initialization scripts” tab, paste this URL
https://raw.githubusercontent.com/{OWNER}/{REPO}/refs/heads/main/init.sh, after replacingOWNERandREPOby the owner and repository name you chose in step 1; - In the “Friendly Name” field, choose a meaningful name (for instance
dev_Intro_To_Linear_Regression);
- In the “Repository” field of the “Git” tab, paste the URL of the repository you created in step 1 (for instance:
https://www.github.com/AIML4OS/Intro_To_Linear_Regression); - In the “Network Access” tab, enable access to your service through port 5000;
- In the “Initialization scripts” tab, paste this URL
- Click on Save configuration;
- Click on Launch;
- Open the Vscode service;
- You’re ready to go!
Here’s a video summarizing these manual gestures for configuring the Python environment. Setting up the R environment is very similar. The values entered in the fields, in particular the initialization script, are those given in the example above: adapt these values to your needs.
3.2.3 How to use an existing configuration
Once a configuration is defined, using it is very easy and very fast:
- Go the “My Services” Tab;
- On the right side of the screen, find the configuration of your project and click on Launch;
- Open the Rstudio service;
- Click on the Rproj file to open the RStudio project (this may take a while because
renvis slow at installing packages); - You’re ready to go!
Rstudio services may take a lot of time to start (up to 10 minutes!), because installing dependencies with renv is quite slow. If you get a time-out error, close and re-open the service (but do not delete it!), it will open eventually.
- Go the “My Services” Tab;
- On the right side of the screen, find the configuration of your project and click on Launch;
- Open the VSCode service;
- You’re ready to go!
3.3 Step 3: develop resources with Quarto
If you have created a repository from a template and defined a development configuration, developing resources basically means modifying and extending the minimal examples available in your repository.
3.3.1 Change the URLs
The first thing you must do is change the URLs of the repository in the _quarto.yml file:
Open the
_quarto.yml;In section Section 3.1.2, you chose the
Ownerand theNameof your repository. So:- in the
repo-urlfield, replace the URL byhttps://github.com/{Owner}/{Name}; - in the
site-urlfield, replace the URL byhttps://{Owner}.github.io/{Name};
- in the
Commit this change.
- The link
https://{Owner}.github.io/{Name}does not work yet, because the Github Pages website does not exist yet. This link will work once you complete the procedure described in section Section 3.4. - If your repository is hosted by the AIML4OS organization on Github, you just have to replace the
Nameof the repository. - The case used in the URLs does not matter: upper case (
AIML4OS) and lowercase (aiml4os) are completely equivalent.
3.3.2 Manage data (if needed)
Depending on your project, your scripts may require some data, for instance to train a model. However, when you start a service on SSPCloud (VSCode or Rstudio), it does not contain any data. That implies that you have to download data into your service. Of course, you could do it by hand every time you start a service, but we strongly recommend that you automatize this step. The simplest way to proceed is to upload your data on the S3 storage service of SSPCloud, and then download it from S3 into your service every time you start a service.
3.3.2.1 Upload data to S3
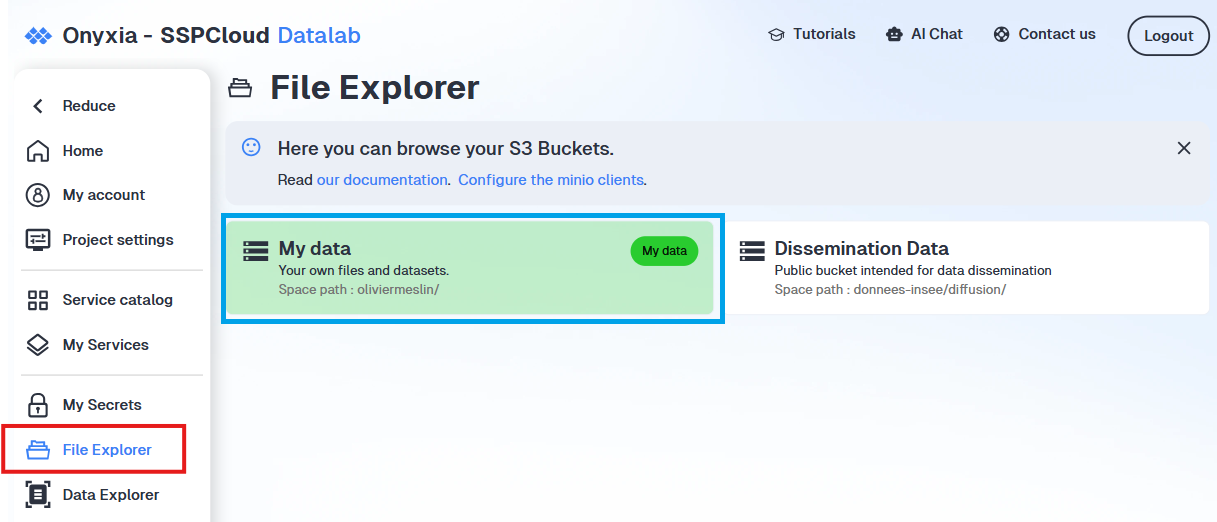
The simplest way to upload data to S3 is to use the graphical interface available on SSPCloud. You have to do only once (except if you want to change or update the data, of course). To do so, click on “File Explorer” on the left hand and then on “My data”.
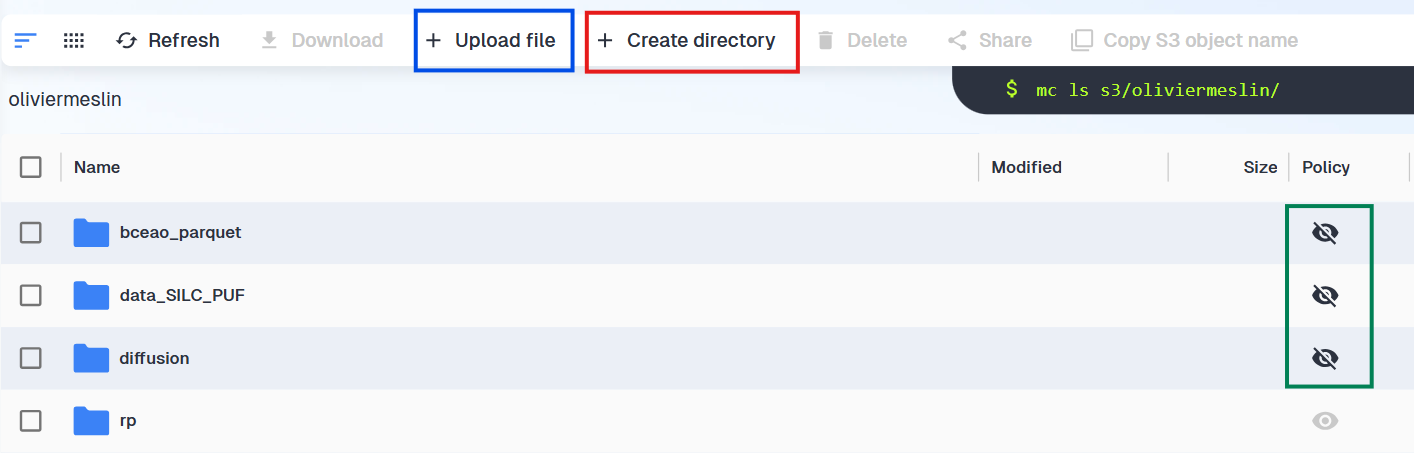
You can upload a file by navigating clicking on “Upload file” (blue rectangle). You can also create a subfolder by clicking on “Create directory” (red rectangle).
- Choose carefully in which subfolder you upload your files, because moving files from one subfolder to another one on S3 is not very convenient.
- Remember that only open data can be uploaded on S3.
- By default, all files stored on
SSPCloudare private, meaning only you can see the files located in your bucket. If you want other people to access the data, do not forget to make them publicly available by clicking on the eye on the right hand side (green rectangle). Your file is public if you see , your file is private if you see .
Once again: no sensitive data!!
3.3.2.2 Download data
To download data automatically into your service, you just have to adapt the download_data.sh file (in the sspcloud folder of your template). There are two things you can change:
DEST_DIRis the folder in your service where data will be downloaded (/home/data/by default);FILESis the list of URLs of your data files (where data is downloaded from).
To obtain the URL of your data files, do the following:
- Use the File Explorer to navigate and navigate to the file you want.
- The S3 path of your file is simply the path of the folder available in the top right corner of the explorer (red rectangle) and the name of the file (blue rectangle). In the screenshot above, the S3 path of a file in the data_SILC_PUF folder is :
s3/oliviermeslin/data_SILC_PUF/data_SILC_d2013.parquet. - The URL is obtained by replacing
s3/as shown on the web interface byhttps://minio.lab.sspcloud.fr/. If the S3 path of the file iss3/oliviermeslin/data_SILC_PUF/data_SILC_d2013.parquet, then the file URL will behttps://minio.lab.sspcloud.fr/oliviermeslin/data_SILC_PUF/data_SILC_d2013.parquet. - Check that your files are public (green rectangle). For instance, in the screenshot the files are not public.
- Do not forget to test that your URLs are working!
In the download_data.sh script, the file url should begin solely with s3sspcloud. It will not work if the file path starts with s3. When you have found the file path using previous comments, replace s3 with s3sspcloud. For example, use s3sspcloud/oliviermeslin/data_SILC_PUF/data_SILC_d2013.parquet and not s3/oliviermeslin/data_SILC_PUF/data_SILC_d2013.parquet.
This is to avoid confusion among different S3 settings of your SSPCloud environment.
3.3.3 How to write Quarto documents?
Most of the resources you will develop will take the form of Quarto documents, that you will either provide to final users or compile to final outputs (for instance, websites or Jupyter notebooks). Therefore, you must learn how to use Quarto. Fortunately, Quarto is easy to use, has an amazing documentation and there are plenty of resources online to help you.
3.3.4 Developing resources
Developing resources (html pages published on the website or interactive environments) with the AIML4OS templates is very easy: you just have to write text and code chunks in the existing qmd files (index.qmd and chapter1.qmd) or to add new Quarto documents. Two important remarks:
The
index.qmdfile is the starting page of your project: you should not delete or rename it.You must specify the output format you want in the header of each qmd file:
- if you want a static html page, specify
format: html; - if you want a Jupyter notebook (Python only), specify
format: ipynb; - if you want a Quarto file with
Rchunks (Ronly), do not specify anything.
- if you want a static html page, specify
3.3.4.1 Building and previewing your website
The first kind of output you may want to produce is a static website, consisting in a series of html documents. If you add new pages to the website (preferably in the chapters subdirectory), do not forget to add them to the structure of the website by modifying the _quarto.yml file in two places: in the render argument (so that Quarto compiles them), and in the contents of the sidebar argument (so that all chapters are in the sidebar of the website).
It is often convenient to have a look at what this website looks like while developing it. You can preview your website from the command line by running:
quarto preview --port 5000 --host 0.0.0.0Then go to https://datalab.sspcloud.fr/my-services, open the README of the service you are using and click on the link to the external port.
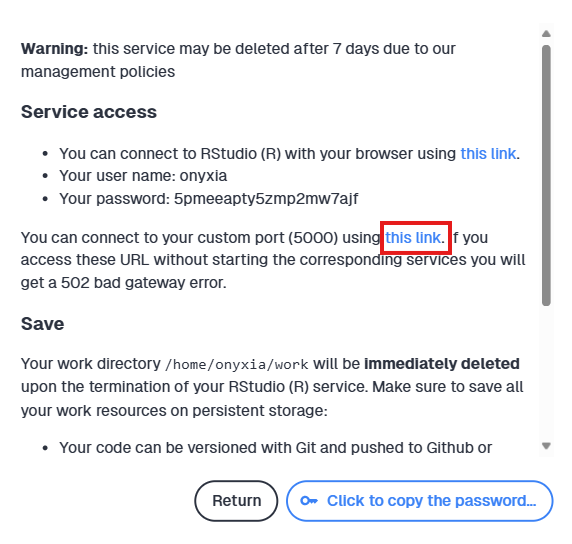
If the website preview is inaccessible due to a missing link in the README, you may have forgotten to open port 5000 in your configuration. This is easily solved:
- Close your RStudio/VSCode service (after committing and pushing all changes!);
- Modify your configuration: in the “Network Access” tab, enable access to your service through port 5000 and save this new configuration;
- Launch again your RStudio/VSCode service.
3.3.4.2 Creating interactive scripts
The second kind of output you may want to produce are interactive environments. These are particularly useful if your resources contain exercises. The final outputs will be quite different for R and Python (Jupyter notebooks for Python, Quarto documents with R chunks for R), but these resources can nonetheless be developed using Quarto.
Here is how you can produce a Quarto file with R chunks:
- Create a new Quarto file and store it in the
exercicessubfolder; - Develop the content;
- Do NOT add the qmd file to the list in the
renderargument of the_quarto.ymlfile. This file does not need compilation.
The notebooks subfolder of the R template already contains an example.
You should not use install.packages() anywhere in your R resources because it is not the proper way to manage package requirements (see below for recommendations on dependency management).
Here is how you can produce a Jupyter notebook for Python:
- Create a new Quarto file and store it in the
notebookssubfolder; - Do not forget to write
format: ipynbin the header; - Develop the content;
- Add the qmd file to the list in the
renderargument of the_quarto.ymlfile, so that Quarto compiles it into a Jupyter notebook.
The notebooks subfolder of the Python template already contains an example (notebook1.qmd).
You should not use pip install anywhere in your notebooks because it is not the proper way to manage package requirements (see below for recommendations on dependency management).
3.3.5 Handling dependencies when developing resources
A major challenge in any data science project is to make sure that its codes can be re-run without error by someone working in a different environment (this is called portability). Various technical requirements must be met to ensure portability; one of them is to keep track of all packages needed to run the code (and of the exact version of each package!), so that a new user can reinstall them easily. The dependency management tool depends on the language you use:
- If you use
R, we recommend that you userenv; - If you use
Python, we recommend that you useuv.
renv is an R package that helps you manage the dependencies of each of your projects. It means that renv lets you keep track of what packages are needed to run your code, and in what exact version. More precisely, using renv adds two specific files to your project:
- The lockfile
renv.lockrecords information about every package used in the project, so that these packages can be re-installed on a new machine; - the
.Rprofileproject file. This file is run automatically every time you startRso thatrenvis used properly.
Here is how to use renv:
- The first step in using
renvis to initiate the tracking of dependencies usingrenv::init(). You do not need to do it if you use theRtemplate because this was already done in the template. - When developing resources, you should regularly run
renv::snapshot(). This command will analyze yourRand Quarto scripts, detects what packages are used, and updates therenv.lockfile. Do not forget to commit and push the changes to therenv.lockfile! - When you start working on your project with a new service, you should run
renv::restore(). This command will reinstall all the packages listed in therenv.lockfile.
If you forget to update the renv.lock file, your Github Actions workflow is likely to fail, and you probably won’t be able to execute your R script in a new RStudio service. Keep calm, here is the solution: just run renv::snapshot(), commit and push the changes to the renv.lock file. This should solve the problem.
For more information, see the official documentation of renv.
uv is a fast Python package manager that helps you track and manage dependencies per project, similarly to renv for R. More precisely, uv can be used to create a virtual environment for your Python project. A virtual environment contains your project’s Python and its packages, and is isolated from other projects and the system’s Python. This means that different projects can use different versions of packages (and even different versions of Python!) without conflicts. uv helps create and manage these virtual environments easily, making sure all needed packages for your project are installed and kept organized. Using uv, you can ensure your project is reproducible, fast to install, and easy to deploy.
Here is the very short introduction on how to use uv:
The basic command to start using
uvisuv init. This command adds to your project thepyproject.tomlfile that defines the project dependencies and metadata. This file is the central piece of the dependency management. You do not need to use this command if you use the Python template because this has already been done (the template already contains apyproject.tomlfile).When you start using a new package in your project, you must explicitly add it to the dependencies by running the command
uv add [package_name]. This command will add this package to thepyproject.tomlfile.Commit and push the changes in the
pyproject.tomlfile.When you want to recreate your environment from scratch on a new machine (or in a new service), you must run the command
uv sync. This command will install all packages specified in thepyproject.tomlfile (and their own dependencies). You do not need to use this command if you use use the Python template because the initialization script already runsuv sync.
If you forget to use uv add [package_name] to add to your pyproject.toml file, your Github Actions workflow is likely to fail, and you probably won’t be able to execute your Python script in a new VSCode service. Keep calm, here is the solution: just identify what are the missing packages, use git add, commit and push the changes to the pyproject.toml file. This should solve the problem.
3.4 Step 4: set up a Github pages website
This step is optional, depending on whether your resources include a website. You can skip this step if your resources consist only in interactive environments (Jupyter notebooks for Python, interactive Quarto documents with R chunks for R).
3.4.1 What are Github Actions and Github pages and why are they useful?
If you are developing a website or Jupyter Notebooks for educational purposes, you probably want to publish them online. If you perform the publication manually (building the website/notebooks, then publishing them), you’ll have to re-do this series of tasks every time you change your website. This is time-consuming, repetitive and boring. But fortunately, you can automate this process thanks to GitHub Actions and Github Pages:
- GitHub Actions is a tool built into GitHub that runs pre-defined tasks like testing, building, and deploying code when specific events occur in a repository. For instance, GitHub Actions may perform a series of task every time you push on the
mainbranch of your repository, without you doing anything manually. - GitHub Pages is a another tool from Github that lets you publish static websites directly from a GitHub repository; it is often used for project documentation or personal portfolios.
The main message is: by combining GitHub Actions with GitHub Pages, you can set things up so that every time you make changes to your repository, GitHub Actions automatically updates your website and publishes it on GitHub Pages. This will save you a lot of time!
3.4.2 Create the gh-pages branch
When developing resources, you will most likely use the main branch. However, for Github Actions to work, you need an additional branch gh-pages used by Github to deploy websites. This one will be rewritten automatically by Github after every Github Actions workflow. However, you need to create it first. This should be done only once. Quarto documentation gives this command to create that branch. Be careful with that command, do not use before having done a first push on Github.
git checkout --orphan gh-pages # Create an empty branch called gh-pages
git reset --hard # make sure all changes are committed before running this!
git commit --allow-empty -m "Initialising gh-pages branch"
git push origin gh-pages # Pushing so that the gh-pages branch exists on the remote repo
git checkout main
3.4.3 Check Github settings
After you created the branch gh-pages, you have to check that Github actually understood that the website needed to be deployed from this branch. This is fairly easy:
- Go to your repository on Github and click on
Settings;
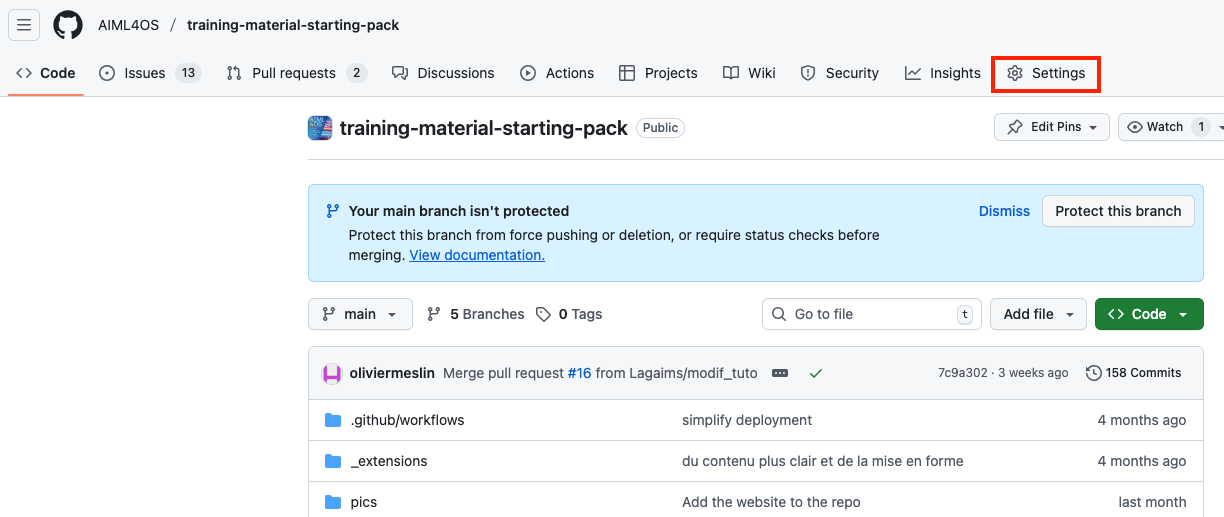
- Go to the
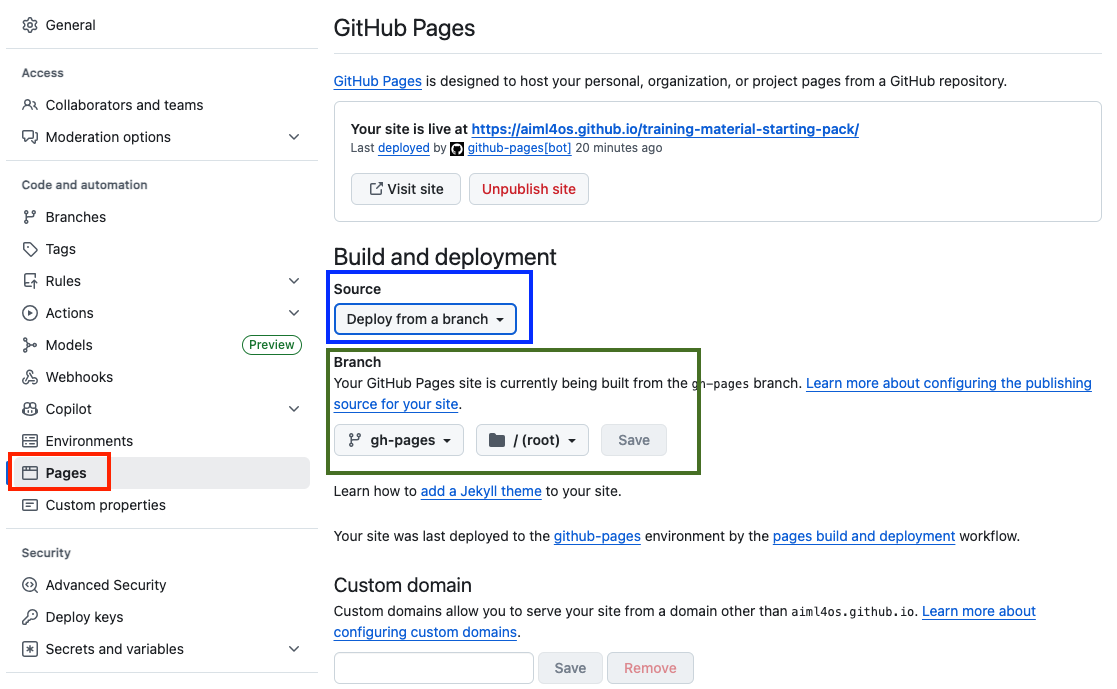
Pagestab (red rectangle); - Check that the
Sourcesetting is set toDeploy from a branch(blue rectangle); - Check that the
Branchsetting is set togh-pages(green rectangle).
3.4.4 Set up a Github Actions workflow
You need to define a Github Actions workflow to automate output construction and deployment. A GHA workflow is a list of instructions (for instance: install R, install packages…) that are executed automatically every time a certain event happens (for instance every time you push on the main branch). A GHA workflow is defined using specific yaml scripts, located in the .github/workflows directory of your repository. The templates already contain standard workflows that you can use as a starting point. We recommend that you have a careful look at these workflows; comments were added so that they are easy to follow.
A few important remarks on automated deployment:
- The website is deployed at an URL that depends on the owner and the name of the repository:
https://{Owner}.github.io/{Name}/. Don’t forget to change thesite-urlin the_quarto.ymlfile of your template tohttps://{Owner}.github.io/{Name}/. - You can monitor Github Actions jobs in the “Actions” tab of the Github repository of your project. Do not be afraid if your jobs fail at first; getting Github Actions to work often requires some debugging.
3.4.5 Add the website URL to your Github repository
You can add the website URL to your Github repository so that it is easier to find. To do so, go to your repository using your browser, click on the little wheel on the far right (see the screenshot below), paste your website URL in the Website field, and save changes.

If the settings of your Github Actions and Github Pages are well defined, you do not have to do anything to update the website. You just have to modify your Quarto files (for instance by adding a paragraph), commit and push these changes to the main branch: the site will be updated automatically. It may take a few minutes for GitHub Actions to propagate the changes to your Github Pages website. That’s why it’s often more convenient to develop your GitHub Page using Onyxia, where you can preview all your updates instantly within just a few seconds.
You can also follow the Github Actions workflow in the Actions tab of your repository.
3.5 Step 5: make your interactive environments easily available on SSPCloud
This step is optional, depending on whether your resources include interactive environments (Jupyter notebooks for Python, interactive Quarto documents with R chunks for R). You can skip this step if your resources consist only in a Quarto website.
Jupyter Notebooks
Notebooks are automatically made available through the website deployed via Github Actions. Their location on the website depends on the location of of the qmd used to build them within the Git repository. For example, the notebook available in the Python template will be accessible via this link because the qmd file notebook1.qmd is located in the AIML4OS-template-quarto-python/notebooks/ folder of the repository.
R only: accessing the Quarto files
Quarto exercise files with R chunks can be used directly, no compilation is necessary. As a consequence, they are located on the Github repository, not on the website. To use these files, you must use the raw Github URL. This URL is available by clicking on the raw button when opening the file on Github. For example, the exercise available in the R template will be accessible via this link because the qmd file exercise1.qmd is located in the AIML4OS-template-quarto-r/exercises folder of the repository.
3.5.1 The initialization script for trainees
Up to now, we have explained how to initialize and pre-configure the trainers’ development environment (with the init.sh script). It is important to understand that while this pre-configuration is convenient but not essential when building educational resources, defining such a pre-configured environment is mandatory when making ready-to-use tutorials available to trainees. For this purpose, the templates offer an example to be edited, depending on the URL on which your resources are made available.
The script init-trainees.sh provided in the sspcloud folder of the template helps you to configure the environment for trainees on SSPCloud. This script does two things: install the environment needed to run the notebook and download the notebook you want to provide trainees with.
You do not need to modify this script. This script takes only one argument: the path of the notebook within the website (see next section). If the notebook you want to make available is located at is available at https://aiml4os.github.io/AIML4OS-template-quarto-python/notebooks/notebook1.ipynb, then this argument should be notebooks/notebook1.ipynb.
The script init-trainees.sh provided in the sspcloud folder of the template helps you to configure the environment for trainees on SSPCloud. This script does two things: install the environment needed to run the notebook and open the Quarto file you want to provide trainees with.
You do not need to modify this script. This script takes only one argument: the path of the Quarto file within the Github repository (see next section). If the Quarto file you want to make available is located at is available at https://github.com/AIML4OS/AIML4OS-template-quarto-python/blob/main/chapters/chapter1.qmd, then this argument should be chapters/chapter1.qmd.
When using initialization script, you must put the raw github URL of the script in the Initialization scripts field of the configuration of your SSPCloud service. This URL is available by clicking on the raw button when opening the file on Github (see screenshot below). The URL should have a pattern similar to this one: https://raw.githubusercontent.com/InseeFrLab/AIML4OS-template-quarto-python/refs/heads/main/sspcloud/init-trainees.sh.

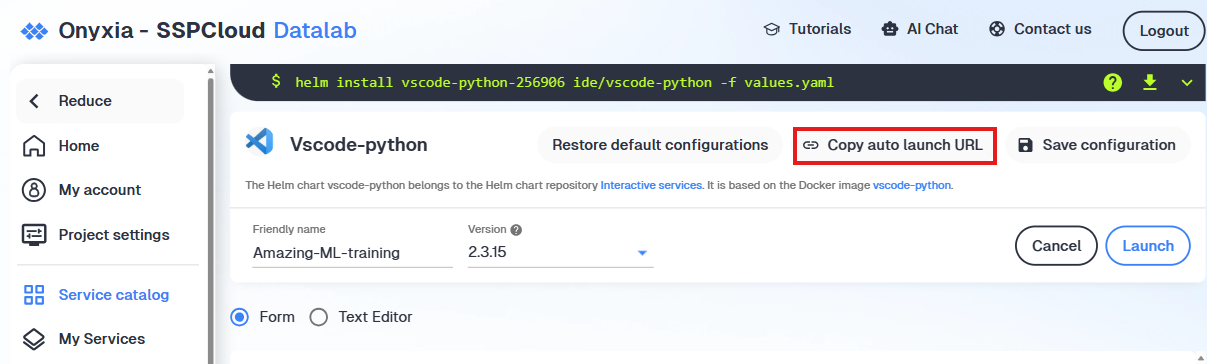
3.5.2 Setting up an auto launch URL
A convenient feature of SSPCloud is that you can make a whole training environment available through one URL link: in one click, trainees open a VSCode service that contains a Jupyter notebook, the data used by the notebook, all dependencies needed to run the notebook, and sufficient resources to run the code.
To do so, just follow two steps:
Define all aspects of the training environment using the usual interface. Here are the elements you will probably want to configure:
Friendly Name: do not forget to use a meaningful name (“Intro_To_Deep_Learning”), that will be more convenient for trainees;Resources: choose the requests and limits that are well-suited for your use case. Some trial-and-error might be necessary here. However, in most cases, you don’t need to change the resources there because default settings ofSSPCloudfit most needs.Initialization scripts:Use a custom script (URL): paste the URL to the initialization script for trainees (see previous section).Arguments for the custom script: write the name of the notebook (see previous section).
GIT: In the “Repository” field, paste the URL of the Github repository containing the training resources.
Copy the link provided at the top of the interface by clicking on “Copy Auto Launch URL”, and paste it wherever you want. Anyone with an
SSPCloudaccount can use it to open a pre-configured service. Do not forget to test your link a few times to be sure it works. Do not be afraid if it does not work on the first time, some trial-and-error is often necessary.
An auto-launch URL is typically very long, something like: https://datalab.sspcloud.fr/launcher/ide/vscode-python?name=Notebook1&version=2.3.18&s3=region-79669f20&init.personalInit=«https%3A%2F%2Fraw.githubusercontent.com%2FAIML4OS%2FAIML4OS-template-quarto-python%2Frefs%2Fheads%2Fmain%2Fsspcloud%2Finit-trainees.sh»&init.personalInitArgs=«notebooks%2Fnotebook1.ipynb»&git.repository=«https%3A%2F%2Fgithub.com%2FAIML4OS%2FAIML4OS-template-quarto-python.git»&autoLaunch=true
We recommend two things:
- Read carefully the auto-launch URL a few times (don’t be afraid!). You will see that it simply contains all the elements you defined in the configuration: the service you want to use (VSCode/RStudio), the friendly name, the URL of the init script and so on. This is not so complicated!
- Check that there is no sensitive information in the Autolaunch URL (such as your Github token). If something looks strange, take the time to understand what is the problem.
3.5.3 Adding a launch button to your website (bonus)
Let’s say you have done everything described before, and you have a working auto-launch URL. You could of course send it to trainees and ask them to copy and paste it in their browser to access the service, but a ready-to-use button is much more user-friendly! Just take this code snippet as a basis and replace AUTOLAUNCH_URL_THERE with your own quick launch URL:
<a href="AUTOLAUNCH_URL_THERE" target="_blank" rel="noopener" data-original-href="AUTOLAUNCH_URL_THERE"><img src="https://custom-icon-badges.demolab.com/badge/SSP%20Cloud-Launch_with_RStudio-blue?logo=vsc&logoColor=white" alt="Onyxia"></a>which, when formatted, will give a button like this
<a href="AUTOLAUNCH_URL_THERE" target="_blank" rel="noopener" data-original-href="AUTOLAUNCH_URL_THERE"><img src="https://custom-icon-badges.demolab.com/badge/SSP%20Cloud-Launch_with_VSCode-blue?logo=vsc&logoColor=white" alt="Onyxia"></a>which, when formatted, will give a button like this
3.5.4 Add your resources on the training webpage hosted on SSPCloud
If you are ready to make your resources available to trainees, just send an email to innovation@insee.fr, and the IT Innovation Team of Insee will help you through the process of publishing your resources on SSPCloud.
4 Replay of past webinars
A webinar tool place on 2025, December 10th to present the starting pack. If you missed it, you can have a look at the replay.
Footnotes
Jupyteroriginated from theIPythonproject, an interactive environment forPythondeveloped by Fernando Pérez in 2001. In 2014, the project evolved to support other programming languages in addition to Python, leading to the creation of the Jupyter project. The name “Jupyter” is an acronym referring to the three main languages it supports:Julia,Python, andR.↩︎By default, this service includes a
Pythoninstallation, but does not offer additional software such asR. For multi-language training, you can use theVscode-r-python-juliaservice.↩︎