flowchart LR
    A["🛰️ Images"] --> M
    B["🗺️ Labels"] --> M
    M["Model(SegFormer)"] -->|learns from pairs| T["Trainedmodel"]
    N["🛰️ New image"] --> T
    T --> P["🗺️ Predicted label"]
Project 3 – Satellite Image Segmentation with Deep Learning
| Technical level | Tasks |
|---|---|
| Doing the exercises of steps 1, 3 and 4, relying on clues and solutions if needed. | |
| Doing the exercises of steps 1 to 4 | |
| Doing the exercises of steps 1 to 4, without relying on clues and solutions. |
Introduction
Satellite imagery is one of the richest data sources available for understanding how land is used and how it changes over time. With this project, you will work with Sentinel-2 multispectral images from the European Copernicus programme and use a deep learning model (SegFormer) to perform semantic segmentation : classifying every pixel in an image into a land-cover category. SegFormer is a vision-transformer architecture that handles arbitrary input resolution and many input channels — well suited to Sentinel-2’s 12 surface-reflectance bands plus two derived vegetation/water indices (14 input channels in our pre-processed tiles). CNN baselines such as U-Net would also work but are less effective at capturing the long-range context that helps land-cover classification.
Machine learning in 90 seconds
If you haven’t worked with machine learning before, here is the whole idea of this project in one paragraph.
Supervised learning means showing a model many (input, correct-answer) pairs and letting it figure out the mapping between them on its own. Once trained, we feed it a brand-new input and it predicts the answer. In this project, the inputs are Sentinel-2 satellite tiles and the answers are land-cover maps from CLC+ Backbone, a high-resolution land-cover product produced by the Copernicus Land Monitoring Service covering the whole of Europe.
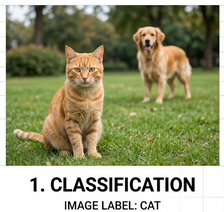
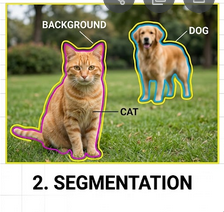
Classification vs. semantic segmentation. Most introductory ML examples deal with classification — one label for a whole image (“this is a cat”). Land-cover mapping needs something finer: semantic segmentation, where the model assigns a class to every pixel, producing a colored mask the same shape as the input. We don’t just want to know “there is forest in this tile” — we want to know exactly which pixels are forest, which are water, and which are buildings.
What you will learn
By completing this project you will learn to:
- Download and manipulate satellite imagery and land-cover labels
- (Optional) Use CDSE interfaces to fetch Sentinel2 images
- Understand the structure of multispectral raster data (bands, CRS, bounding boxes)
- Manipulate geodata and associate it to maps
- Run inference with a pre-trained SegFormer model to produce land-cover maps
- Compute regional statistics (area by class, artificialization rates) using administrative boundaries
- (Optional) Train a segmentation model from scratch and track experiments with MLflow
Structure of the project
This project has five sections (listed in the banner at the top of the page):
- Data Acquisition & Manipulation — Download Sentinel-2 images and CLC+ labels, visualise and manipulate raster data.
- Model Explanation — Understand the SegFormer architecture, inspect its parameters, and trace a forward pass.
- Model Training (optional) — Train the model yourself, configure callbacks, and track experiments with MLflow.
- Inference — Use a pre-trained model checkpoint to produce land-cover maps.
- Statistics — Compute regional statistics from the predictions using administrative boundaries.
Initialization of the project
Create a Vscode-python service on SSP Cloud.
In the service, open a terminal by clicking on , then Terminal > New Terminal. Clone the project repository with:
git clone https://github.com/AIML4OS/funathon-project3.gitStructure of the project:
- The
.qmdfiles and the_quarto.yamlfile are necessary to build the website; - The file
pyproject.tomldescribes the dependencies of the project; - Final solutions are available in each
.qmd.
Installation of dependencies
Install the project dependencies by running the following command in the terminal:
source ./init.shSelect the Python interpreter
To enable interactive code execution, point VSCode at the project’s virtual environment:
- Open the Command Palette with
Ctrl+Shift+P(Windows/Linux) orCmd+Shift+P(Mac) - Search for and run
>Python: Select Interpreter - Choose Enter interpreter path… and enter:
/home/onyxia/work/funathon-project3/.venv/bin/python
Working on the exercises
Create a file called scratchpad.py at the root of the repository and use # %% markers to divide your code into individually executable cells — just like Jupyter notebook cells, but in a plain .py file.
# %%
import rasterio
# your code here …

# %%
# next exercise …
To run a cell:
- Open
scratchpad.pyin VSCode — a Run Cell button appears above each# %%marker - Click Run Cell (or press
Shift+Enter) to execute that block in an interactive Python window - Outputs and plots appear inline next to the editor
Tip
The tutorial pages contain the full exercise descriptions, hints, and solutions. Write your code in scratchpad.py and use the tutorial pages as reference.
Note
scratchpad.py is listed in .gitignore, so your scratch work will not be accidentally committed.